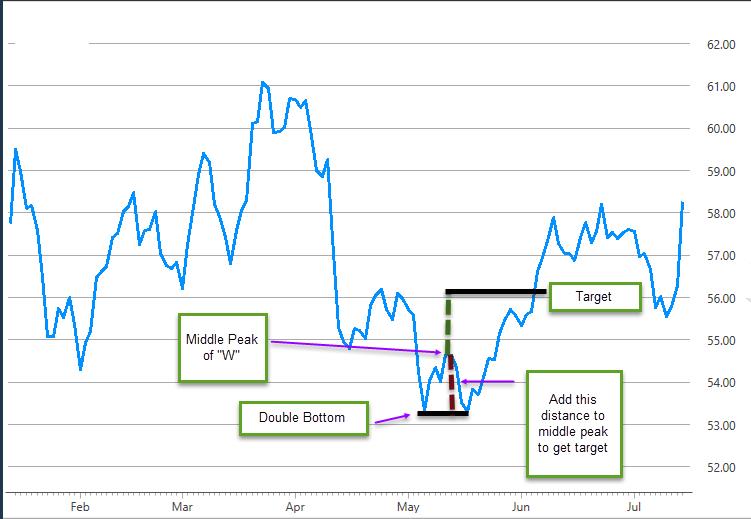
Most traders who have even a passing acquaintance with technical analysis have heard about a classic chart pattern called the double bottom. It looks like a “W” on the chart. The standard trading methodology suggests buying when the stock breaks out past the middle peak of the W” and setting an initial target by adding the distance between the bottoms and the middle peak to the breakout price. (See figure 1). By buying the breakout a trader is hoping for a higher probability that the stock will reverse as opposed to going sideways. However, the temptation is always there to try and enter the trade earlier and capture some of the move up from the second bottom to the middle peak, which can sometimes be substantial, especially when the double bottom is quite tall.

Fig 1
The Trade Setup
If an earlier entry appeals to you, here are some possible clues you can look for:
How the bottoms form in relationship to the Bollinger Bands®
In order to use Bollinger Bands® to clarify bottoming formations we have to understand what they are really telling us. Bollinger Bands® are in essence showing us what are relative highs and lows given changes in volatility. For example, let’s say a stock runs up to a new high, then pulls back, and then moves back to a marginally higher high. That second high is obviously a higher high on an absolute basis. But is it really a higher high on a relative basis if market volatility picked up substantially when it was made? Bollinger Bands® can help answer this question.
In my experience, buying into the second bottom is considered a better practice when it forms like this:
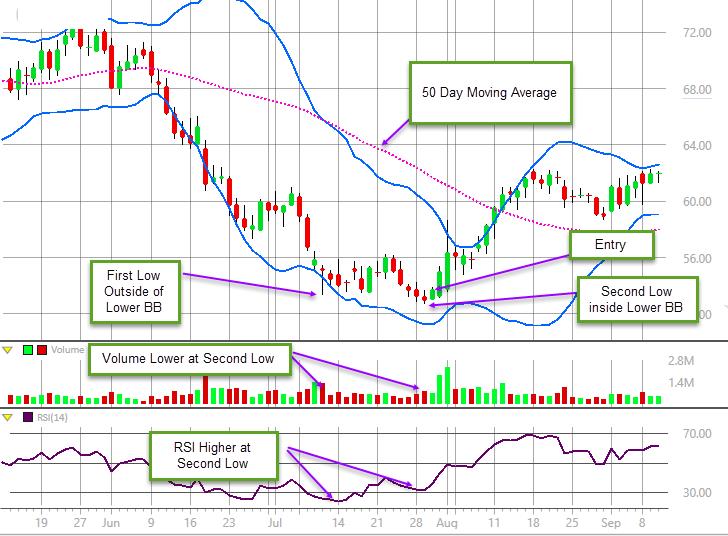
• The first low is touching or outside the lower band
• The second low is inside the lower band
The second low can be higher or lower than the first low. The fact that the second low is within the lower band is telling us that it is a higher low on a relative basis. This fact allows us to consider buying the second low, even if it is lower than the first one with, for me, added confidence.
How the RSI behaves when the bottoms form
The RSI is a type of indicator called a momentum oscillator and is commonly used to detect overbought and oversold conditions. Welles Wilder, who developed the indicator in 1978, felt the most effective use of the RSI was looking for divergences to help identify potential changes in trend. For a double bottom we would like to see the second bottom form at the same or slightly lower price level than the first, with the RSI having a higher value at the second bottom than at the first. What all this is telling us it that the second low is being made with less momentum than the first.
Where the bottoms form in relation to moving averages
I have found that double bottoms tend to be more reliable if they form under a moving average of appropriate length. For shorter term bottoms I check to see if they are forming under the fifty day moving average. Longer term bottoms should form under the 200 day moving average.
Volume Pattern
Double bottoms tend to be more reliable if the volume as the second bottom forms is less than was seen on the first bottom. Also, it is better if volume is generally declining as the pattern progresses.
Overall market environment
Buying a stock near the second bottom is a bullish trade and bullish trades obviously work out more often if the overall market is bullish too. One simple method I use to assess the health of the market is to look at the slope of the 100 day simple moving average of an index that contains stocks similar to the one I want to trade. For example if I am attempting to pick a bottom in a large cap technology stock, I’ll look to see if the 100 day moving average of the NASDAQ 100 is sloped up.
Figure 2 shows a typical set up.

Fig 2
Managing the Trade: The Two Stage Approach
Once the second bottom is identified with the characteristics listed above, I typically wait for some type of confirmation. This could be a close near the high of the day with an increase in volume, or even better, seeing the stock trade above the high of the previous day. For the target, I will sell at the rally high (middle peak of the “W”) which often acts as a resistance level. If the stock moves against me I will consider exiting if it trades below the lower of the two lows.
If the stock reaches my initial target of the rally high, I will sell and take a profit. However, I am not necessarily done with the trade. Remember that if the stock can clear the middle peak of the “W” the odds increase that that the stock is really reversing its previous trend. If that occurs, I will buy back into the stock with an initial profit objective based on the classic method of adding the distance between the bottoms and the middle peak to the breakout price. Naturally there are no guarantees that the stock will achieve this target price. If the stock doesn’t reach this objective and trades back below the middle peak I will exit the trade, hopefully for only a small loss.
This two stage approach has several advantages. If the stock only makes it to the middle peak and then reverses, I should have a profit. If it does break out but then fails, I have a loss on the position I re-entered but the gain on my first trade generally still gives me an overall profit. Finally if the breakout succeeds and travels to the target, I will have captured almost the entire move from the very bottom of the formation.
Happy trading!
Lee Bohl can be contacted at Charles Schwab UK Ltd

Fig 1
The Trade Setup
If an earlier entry appeals to you, here are some possible clues you can look for:
How the bottoms form in relationship to the Bollinger Bands®
In order to use Bollinger Bands® to clarify bottoming formations we have to understand what they are really telling us. Bollinger Bands® are in essence showing us what are relative highs and lows given changes in volatility. For example, let’s say a stock runs up to a new high, then pulls back, and then moves back to a marginally higher high. That second high is obviously a higher high on an absolute basis. But is it really a higher high on a relative basis if market volatility picked up substantially when it was made? Bollinger Bands® can help answer this question.
In my experience, buying into the second bottom is considered a better practice when it forms like this:
• The first low is touching or outside the lower band
• The second low is inside the lower band
The second low can be higher or lower than the first low. The fact that the second low is within the lower band is telling us that it is a higher low on a relative basis. This fact allows us to consider buying the second low, even if it is lower than the first one with, for me, added confidence.
How the RSI behaves when the bottoms form
The RSI is a type of indicator called a momentum oscillator and is commonly used to detect overbought and oversold conditions. Welles Wilder, who developed the indicator in 1978, felt the most effective use of the RSI was looking for divergences to help identify potential changes in trend. For a double bottom we would like to see the second bottom form at the same or slightly lower price level than the first, with the RSI having a higher value at the second bottom than at the first. What all this is telling us it that the second low is being made with less momentum than the first.
Where the bottoms form in relation to moving averages
I have found that double bottoms tend to be more reliable if they form under a moving average of appropriate length. For shorter term bottoms I check to see if they are forming under the fifty day moving average. Longer term bottoms should form under the 200 day moving average.
Volume Pattern
Double bottoms tend to be more reliable if the volume as the second bottom forms is less than was seen on the first bottom. Also, it is better if volume is generally declining as the pattern progresses.
Overall market environment
Buying a stock near the second bottom is a bullish trade and bullish trades obviously work out more often if the overall market is bullish too. One simple method I use to assess the health of the market is to look at the slope of the 100 day simple moving average of an index that contains stocks similar to the one I want to trade. For example if I am attempting to pick a bottom in a large cap technology stock, I’ll look to see if the 100 day moving average of the NASDAQ 100 is sloped up.
Figure 2 shows a typical set up.

Fig 2
Managing the Trade: The Two Stage Approach
Once the second bottom is identified with the characteristics listed above, I typically wait for some type of confirmation. This could be a close near the high of the day with an increase in volume, or even better, seeing the stock trade above the high of the previous day. For the target, I will sell at the rally high (middle peak of the “W”) which often acts as a resistance level. If the stock moves against me I will consider exiting if it trades below the lower of the two lows.
If the stock reaches my initial target of the rally high, I will sell and take a profit. However, I am not necessarily done with the trade. Remember that if the stock can clear the middle peak of the “W” the odds increase that that the stock is really reversing its previous trend. If that occurs, I will buy back into the stock with an initial profit objective based on the classic method of adding the distance between the bottoms and the middle peak to the breakout price. Naturally there are no guarantees that the stock will achieve this target price. If the stock doesn’t reach this objective and trades back below the middle peak I will exit the trade, hopefully for only a small loss.
This two stage approach has several advantages. If the stock only makes it to the middle peak and then reverses, I should have a profit. If it does break out but then fails, I have a loss on the position I re-entered but the gain on my first trade generally still gives me an overall profit. Finally if the breakout succeeds and travels to the target, I will have captured almost the entire move from the very bottom of the formation.
Happy trading!
Lee Bohl can be contacted at Charles Schwab UK Ltd
Last edited by a moderator:
