1-2-3-Formations and Ross Hooks

Stickyfingers said:
Yes , lerning by doing .

In the moment I am working in the middle and long timeframe . It takes a long time untill
something is finisched. So I just focus my experience out of the 5 Min. TF in the long
period frame .

Stckf.
Aahh ! Good !
 
Does anyone trades stocks using 1-2-3 and Roos Hooks? if so, could you kindly share your experiences and lessons learned on Time Frame used, TTE (yes or no) and any other aspect you may find important.

Thanks.
 
not roos but ROSS
stil u are right
bumph
Read the bumph believe the hype
WHY o WHY not trade the basics
 
Roberto said:
I'm hoping to set the ball rolling for a discussion of trading with 1-2-3-formations and Ross Hooks, after there's been some interest expressed in these methods recently in other threads.

I thought I'd start off with an example and chart, and now seems a nice time to do so, since I'm trading the EUR/$ at the moment on one of these set-ups.

In my next post, I'll give a link to an online introduction to 1-2-3's in "pdf" (Adobe) format which readers may download, save and print if they want to, and I'll try to give something approaching a "definition" of a Ross Hook without breaching Joe Ross's copyright, if I can.

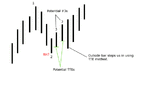
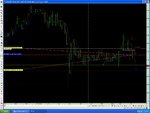
But for the moment, let's talk about this chart ... it's a EUR/USD 30-minute chart from today, and like all my charts, the times shown on it are CET (that's GMT + 1 hour).

The "points" of the 1-2-3-formation are shown in red. The idea is to enter into the downtrend established by the 1-2-3-formation (which itself marked the end of an uptrend, of course), by entering a short position when the price broke through the 2-point, as happened a couple of bars later. Alternatively, one can use Joe Ross's "Traders Trick Entry" (as I did) by entering the short position higher up on the same bar, in the hope that if the "entry signal" turned out to be a false one, one would be able anyway to cover the spread and exit without loss, or even possibly with a small profit. This is a bit of a gamble, but it worked well on this occasion.

The stop-loss for this trade would be placed typically 2 or 3 pips above the "1-point", which is fairly close, as you can see from the chart. One might want to use a different method of stop-placement if a "round number" were involved, especially on an instrument as liquid as this one, but that subject's for another day. The point here is that if prices go up past the "1-point" it invaldiates the trade entry and means that we've basically "got it wrong", so it's where we'd want to get out, simply because we have no reason for being there.

A couple of bars after entering this trade, there was a Ross Hook (shown in green), which was the first failure of a price-bar to make a lower high during the downtrend. The significance of this is that if prices had subsequently turned around and risen (which they didn't), the taking out of the Ross Hook would have been an entry for a long trade (which didn't arise). So in this case the Ross Hook was not relevant to the trade, and I'm showing it simply because it was conveniently there.

Key concept, widely misunderstood: the fact that the top of that bar constituted a Ross Hook was not defined until the bar following it had closed. (Until then, it might have been a reversal). A Ross Hook can arise only during a trend (this is really fundamental), and can be defined only by looking at the bar after it.

My aim with these trades is to close a third (or sometimes a half) of the position fairly quickly to cover the trading costs, and then to let the remaining two-thirds (or half) run, closing it either in one go or in two seperate chunks, depending on all sorts of factors which (as the saying goes) we can talk all about some other time. For the moment, let's just say that 1.3020 or 1.3021 would be a possible "final exit" on this trade, for the unambitious like me anyway, because one might think it would be an area of some expected support, as can be seen from the bottom of the price bar 7 bars before the entry of the trade.

These 1-2-3-formations and Ross Hooks can be traded on virtually any instrument and any time-scale. Personally I find 15-minute and 30-minute charts useful. I sometimes use 10-minute charts as well, if I feel like conentrating hard and haven't got other things to do at the same time. Those wanting to make frequent trades are naturally more inclined to use charts of lower periodicity, to increase their "trading opportunities". They also increase their variability and chances of accidents, quite a common reason for failure. (I offer the observation that it's easily possible, by using charts which are too fast for your money-management and specifically position-sizing, to get wiped out with a system that would have made steady profits on slower charts.) But now we are talking more about risk-patterns and money-management than the trading method itself.

I know from PM's etc. that several other people here are trading these set-ups, so let's hope we can get some interesting discussion going.


I've just read the Law of Charts last night, so my memory is still fresh. and if I'm not wrong, I believe that the chart attached to the 1st post of this thread has an error on it. Namely the bar that was labelled RH is actually not the RH. The real RH is in fact one bar before, ie. the bar that has made the most recent low. I think one way to help recognize the 123 formation and RH is to remember that neither the points nor the RH can be the latest bar, they all need at least one additional bar to define them, because by definition the market has to correct itself for them to be formed. I'm new to this formation, and to trading in general, so please excuse me if I'm wrong.
 
oops, looks like sb has already pointed out the error...
could sb please explain to me what is a non-reversal RossHook?
 
You're quite right in saying the Ross Hook is the preceding bar to the one indicated in Roberto's first post. After some confusion, this error is addressed later on in the thread.

Welcome to a useful pattern. :)
 
After reading this entire thread (well, most of it), I keep coming back to the same problem with the TTE entry. To take advantage of this, it seems you would need to put a stop in below/above every potential #3 bar, which is fine, but everybody keeps posting perfect setups it seems.

What happens when an outside bar occurs and stops us into the trade, but also violates the lower high rule to make a #3 in the case a of 1-2-3 top TTE? Is this then a RH with the hook being what we thought was point #2 of our 1-2-3 formation?

We're kind of screwed in this instance?

Would it not be better, or safer to wait until the #3 point is actually confirmed to be a #3?

Hope what I'm saying makes sense and people are actually still following this thread.
 

Attachments

  • TTE-Example.gif
    TTE-Example.gif
    6.6 KB · Views: 1,144
Hi rcar1046,

Nice post. The problem you specify occurs frequently. In short, lots of 123s fail.

Just to walk through your example -

Assuming of course the high "A" (see attachment) does not print first, you are stopped in short at "B" as you indicate. At this point the #3 bar would be confirmed if the entry bar closed without making a higher high than it already has done.
Unfortunately it does print a new high "A", negating the initial lower high (which might be at point "D") and probably stopping you out.

The setup fails. So you ask if it is better to wait for the bar #3 to be "confirmed". In some cases, yes, and others, no. For every stop loss saved there is likely to be a missed profit. You say "I'll wait for confirmation next time" only to then see the bar on which you would previously have entered plummet several handles. Confirmation, but at the expense of a potentially delightful trade. :(

Anyway, I added some more bars. Imagine you are stopped in at point "C" (on the 2nd grey bar) and are capable of running a profit, at least on a partial postion. The initial loss doesn't look so bad now. You were wrong, took a small loss and moved on to the next entry. That happened to be a double top followed by a LH and LL, and given the length of the #3 bar, the stop was especially tight, so you added a bit of size for good measure. :) PS Yes I know the #3 bar I indicate makes a slightly HH than the #1 bar ... the example was merely for sake of argument rather than technically pure.

[Also, note that (for what it's worth LOL) in this example the #3 bar is fully confirmed at entry "C" because the lower high and lower low cannot be undone, even though the entry bar is still in play. Many combinations of this little fella.

Imho this "confirmation" does not make for a particularly useful practical distinction. In both examples, If the high of #3 is taken out after entry, the stop is hit and we lose. One #3 is unconfirmed at entry, the other is confirmed. In fact, the second #3 bar isn't even a true #3 cause there are "too many" bars between #2 and #3! Does any of this really matter?]

What matters perhaps is that each trader defines their own rules around these 123 building blocks so that the situation is totally unambiguous to him/her. Either an entry is indicated, or it isn't.

Then he/she can choose whether to take or pass on the signal. This introduces the potential gremlin / saviour of discretion, but at least the gremlin has a firm rule-based foundation to dance on, which can make things easier.

It's like having one well-rehearsed muscular reflexive move on a surfboard honed to a tee ... if you try it all the time you will get tired but if you wait for the ocean to provide the conditions that feel right for this move not only will you be in harmony with the ocean but you will know mechanically exactly what to do. And knowing exactly what to do in the event of a signal will help the trader enormously to tune in and find them as he will be calm and have spare processing power at his disposal.
 

Attachments

  • untitled.JPG
    untitled.JPG
    155.2 KB · Views: 1,123
rcar1046 said:
After reading this entire thread (well, most of it), I keep coming back to the same problem with the TTE entry. To take advantage of this, it seems you would need to put a stop in below/above every potential #3 bar, which is fine, but everybody keeps posting perfect setups it seems.

What happens when an outside bar occurs and stops us into the trade, but also violates the lower high rule to make a #3 in the case a of 1-2-3 top TTE? Is this then a RH with the hook being what we thought was point #2 of our 1-2-3 formation?

We're kind of screwed in this instance?

Would it not be better, or safer to wait until the #3 point is actually confirmed to be a #3?

Hope what I'm saying makes sense and people are actually still following this thread.
rcar1046
In your chart the 3 is not made as a lower high and lower low are required. A safer (but not safe) entry would be below the 2.
The rh would be created in your chart by the 3 being made and then the 2 broken. If the breakout bar is followed by a correction, a higher low in this case then that makes the breakout bar a ross hook.
 
rcar1046 said:
After reading this entire thread (well, most of it), I keep coming back to the same problem with the TTE entry. To take advantage of this, it seems you would need to put a stop in below/above every potential #3 bar, which is fine, but everybody keeps posting perfect setups it seems.

What happens when an outside bar occurs and stops us into the trade, but also violates the lower high rule to make a #3 in the case a of 1-2-3 top TTE? Is this then a RH with the hook being what we thought was point #2 of our 1-2-3 formation?

We're kind of screwed in this instance?

Would it not be better, or safer to wait until the #3 point is actually confirmed to be a #3?

Hope what I'm saying makes sense and people are actually still following this thread.

There’s this wierd theory that among the esoteric ‘energy’ healing devices invented through the 1900’s that the inventor is part of the process and that’s why it’s so hard to replicate their results. I have the same theory about a lot of ‘systems for sale’ and in this case am also generalizing it over to Ross’s patterns. A lot goes unsaid, by him and his followers, about the context leading up to a quality 123. Maybe he couldn’t explicate his unconscious competence about it even if he wanted to. Ross, in his early writings, was careful to explain the importance of ‘purity’ in ‘form’ in the formation of his patterns – maybe he’s no longer saying that OR maybe the next generation just doesn’t get it and goes looking for 123’s etc everywhere. It's a rare guru who isn't brought down by his followers. I don’t expect that helps you much...welcome to virtual uncertainty. :D . Also, most also don't realize how small of a profit Ross wants beginners to take from his setups - hence the earlier TTE entry gives a greater prob of hitting the small target...

That said – even though nothing is wrong with a perfect setup and entry signal (whether you use TTE or 3 for entry) – anything can happen AFTER the perfect setup. The situation you described is just one of the ways this pattern can unfold. So find the best stop loss point for this eventuality. Sticking with Ross teachings, that would be at the smallest reasonable place.

and btw I saw no RH's on your illustration... in my opinion, the RH material in his free manual was too integrated with 123's. RH's are better understood all by themselves and apply only to high momentum markets... just my opinion. Wonder what Joe would say? ...

hth

zdo
 
Last edited:
rcar1046 said:
After reading this entire thread (well, most of it), I keep coming back to the same problem with the TTE entry. To take advantage of this, it seems you would need to put a stop in below/above every potential #3 bar, which is fine, but everybody keeps posting perfect setups it seems.

What happens when an outside bar occurs and stops us into the trade, but also violates the lower high rule to make a #3 in the case a of 1-2-3 top TTE? Is this then a RH with the hook being what we thought was point #2 of our 1-2-3 formation?

We're kind of screwed in this instance?

Would it not be better, or safer to wait until the #3 point is actually confirmed to be a #3?

Hope what I'm saying makes sense and people are actually still following this thread.

ZDO makes a good point regarding context. Without it, you are basically trading for tics and can take advantage of the occasional run only if you're trading multiple contracts (if you're trading shares, you're trading multiples anyway). Problem is that if you're trading multiple contracts, the number of failures with this setup will likely bankrupt you before that elusive run presents itself to you.

The "1-2-3" is "borrowed" from Dunnigan and Wyckoff. To the latter, at least, context is everything. Therefore, anyone who wants to enjoy consistent and long-term success with the "1-2-3" or LrH/HrL strategy would do well to study the originators of this approach (as far as charts go, anyway). He will find that a great many marginal trades are eliminated.
 
Context is everything when taking TTE entry.

Taking 123's in isolation with no reference to surrounding price action many will fail, what TTE gives is the the opportunity to trade failed patterns and still come out with small profit / be.

When you start to look at volume set ups alongside 123's (aka Wykoff) and filter trades, oppotunites will fall away but so will failing patterns.

Reversals ( 123's ) are difficult to trade at any time.

Much easier to stick with pullbacks/continuation patterns ( Hooks ) traded with TTE and coming off long price bars and decent volume breakouts.
 
Google yesterday

There was a nice little 123 high and a TTE available on a 7 min chart before yesterdays plummet...
 
The way to exit a congestion

Congestion followed by 1,2,3 High followed by Rh after break-out of the #2 point.
The Rh is a good entry point by TTE. :D
 

Attachments

  • 1,2,3 High.JPG
    1,2,3 High.JPG
    147.8 KB · Views: 572
Rh Trade

Rh after congestion break-out. :cheesy:
 

Attachments

  • RhTrade1.JPG
    RhTrade1.JPG
    146 KB · Views: 812
Trade update

Trade update.
Stop moved. :eek:
 

Attachments

  • RhTrade2.JPG
    RhTrade2.JPG
    146.5 KB · Views: 360
Trade update

Trade closed.
Reason target hit.
P/L +14 pips :cheesy:
 

Attachments

  • RhTrade3.JPG
    RhTrade3.JPG
    145.8 KB · Views: 440
Well done Mr Black, nice trade.
I have been following this thread for a while and my problem is that I know of no tool for TS (or any other SW) that can help find these "ideal" setups.
OK, if one is watching a very small number of charts (eg forex) then it can be done by eye, all be it very tiring.

Am I correct in thinking that there is a great similarity between the set up of a 123, hook or whatever and the various permutations of Elliot wave theory. MT Predictor and Advanced GET spring to mind?

To my uninformed eye, the set ups are almost identical and the advantage is that there are strategies that can be coded into TS to scan for these formations.

Any comments would be most welcome.
 
Top