Introduction
The strategy detailed in this article was written almost two years ago and has been available on the forums throughout that time. Since then, there have been many members of Trade2Win who have commented on how it has improved their trading. Even today, two years on, the rules devised are still valid. There have been new "discoveries"- the magic 32 and 64 to name but one, and yet there are still mysteries that have to be resolved.
Even so, this document will probably stand the test of time, which is to help newbies get a feel for trading the Dow, and at the same time, stay in the game by way of capital preservation. It has given me great pleasure in receiving thanks from many members. Truly gratifying. This is just the beginning, do not despair, there IS light at the end of the tunnel. If this instills some enthusiasm in your loins, you could do worse than reviewing all of the Dow Intraday threads from the archives of T2W where you will no doubt come across more gems from time to time.
The strategy is based on a spread betting system. It can, with experience, be tailored to make it suitable for trading mini-sized Dow futures.
The Strategy
This strategy utilises several technical indicators in order to gauge the correct moment to enter the market:
The Basics
Enter a trade on a confirmation of a break of the 100 EMA - a confirmation is when the price pulls back towards the 100 EMA, and then continues in the direction of the breakout.
Stay in the trade all the time that the price remains through the 100 EMA.
Exit the trade on confirmation of a top or a bottom of a short term trend, or exit the trade when the price has broken the 100 EMA in the opposite direction to your entry plus 20 points.
If you are in a trade, and the price is within + or - 20 points of the 100 MA, DO NOT EXIT a trade. Remember, all the time the price is outside the 100 MA (+/- 20) we DO NOT panic an exit.
DO NOT ENTER a trade if CCI is less than -200, greater than 200, or RSI is less than 20 or greater than 80 - the reason being is that at these points we can experience major volatility.
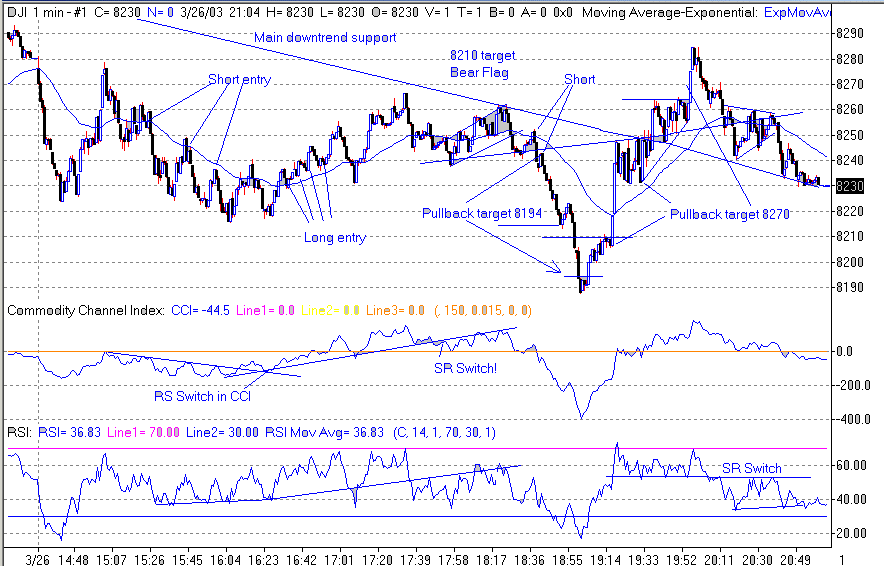
For example, look at Figure 1, when the price pulled back at 8,220 and CCI was near -200; you may be tempted to go long here and get into position early. Bad move! There is a clear bounce off RSI 22 as well... yet the open on this day saw RSI drop to 18 or so: that fixes the low of the day, so you have to be prepared for a drop back to that level.
At these extremes, you need to wait for price confirmation - i.e. a higher high and a higher low, before going long at extremes of RSI and CCI. Remember this strategy is about safe trading, not suicidal gambles. Consistent small wins are the road to riches.
The name of the game is to MINIMISE losses and let WINNERS run. Secondary to this is trying to get the odds in your favour of making a successful trade, as opposed to a gamble.
We'll find out what tops and bottoms we can expect to see, how we can calculate each mini move with expected targets, and how we can analyse the risk we are taking by staying in a trade, as opposed to exiting early.
You should not look at the spread bet price until you are ready to close your trade. Basing your decisions on the SB price will just freak you out of a trade. Now and again, it will undoubtedly cost you a bit more as we enter a "bad" trade. Hopefully, on balance, the number of good trades will more than cover you!
Our typical targets will be between 50 and 150 points. Those of you wanting to take a longer term view (and if you're not averse to holding positions overnight) you can apply exactly the same rules to the 10 minute chart with the same results.
One final rule: as one door closes, another one opens - NOT!!!! Just because we exit at a top, or a bottom, this is NOT a signal to reverse the trade. We are not scalping here!
When you close a winning trade, sit back and congratulate yourself. Take time to see if the action continues in your favour. Did you get out early? Where will we find our next entry?
One of the keys to trading is to be constantly assessing your opinion and the situation. W.D. Gann once said "Always be prepared to have a change of mind".
Chart Settings
1-Minute Charts for DJIA
100 Exponential Moving Average
CCI 150
RSI 14
Stake Size
The important thing, especially when you are first starting out, is to make sure that you "Stay in the Game", as most of your learning will come when you're actually trading.
The accepted level of risk amongst the professional traders and the trading authors is 1% of your capital on every trade. When your risk increases, any bad run that you have will be magnified. You should therefore reduce the stake size to the point where you are very comfortable with the level of loss that a triggered stop will cause.
If you decide on a gamble entry, reduce your risk. If the 100 MA later confirms your entry is correct, increase your stake to "normal size" by adding another half stake.
Entries
Safe entry and safe reversal
The safe entry is from the price crossing the 100 EMA line - and waiting for the pullback. For reversing a position, this is also the criteria that should be used.
caption: Figure 1
Exits - Tops and Bottoms
Now that we have found an entry, we need to check out RSI and CCI to see if we can pick out an exit. If we are getting positive divergence (price down, indicators up), alarm bells need to start ringing. Would this price action continue?
Rule 1: For Positive Divergence (PD) confirmation, there should be 3 peaks lining up in the price and in either RSI, CCI, or - better still - both.
Rule 2: The timescale must be a minimum of 25 minutes across the 3 peaks.
Rule 3: If a divergence started at the open it should always be ignored.
The 3rd low is your first signal to exit the trade. Usually you will get one more chance to exit before the whole thing goes in the other direction, but don't count on it. Don't be greedy. Getting out on the 3rd peak of a 3-peak divergence is usually the very best exit.
Now we need to look for another entry. This could be a LONG or a SHORT. It doesn't matter. Don't be pre-conditioned into thinking a short has to be followed by a long, and vice versa! The reverse is true for Negative Divergence (ND).
PD and ND Exits
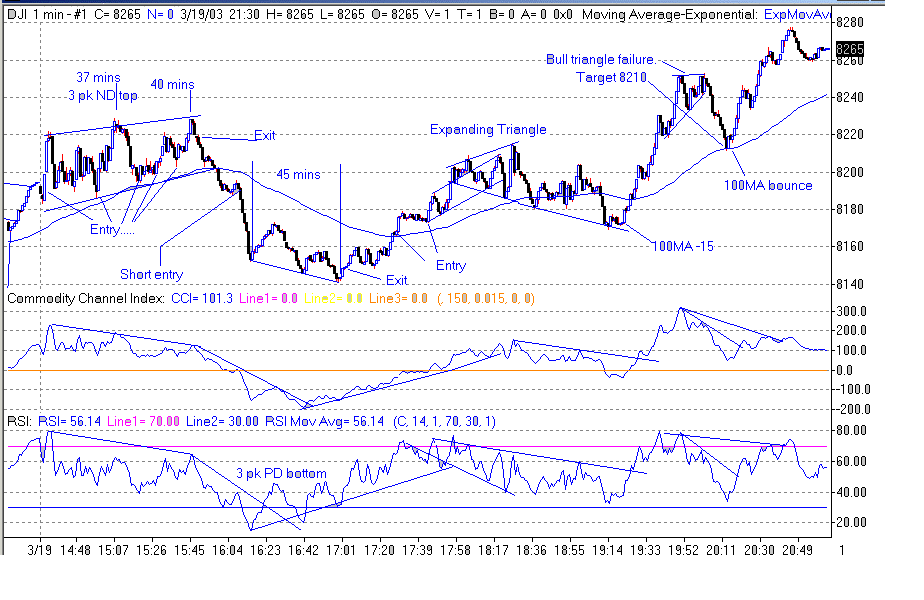
The exit decisions for both ND and PD are clearly shown in Figure 2.
The first exit is from an ND over 37 minutes. At the same time this is forming we are looking for an entry from the open of the trading day. Five possible entries are marked, although by around 15:45 the final peak is formed in the ND and an exit should be taken. The next entry is a safe entry from a pull back to the 100 EMA. Once again, a PD bottom starts forming over 45 minutes, and an exit should be taken at the third trough.
caption: Figure 2
Short term PD and ND
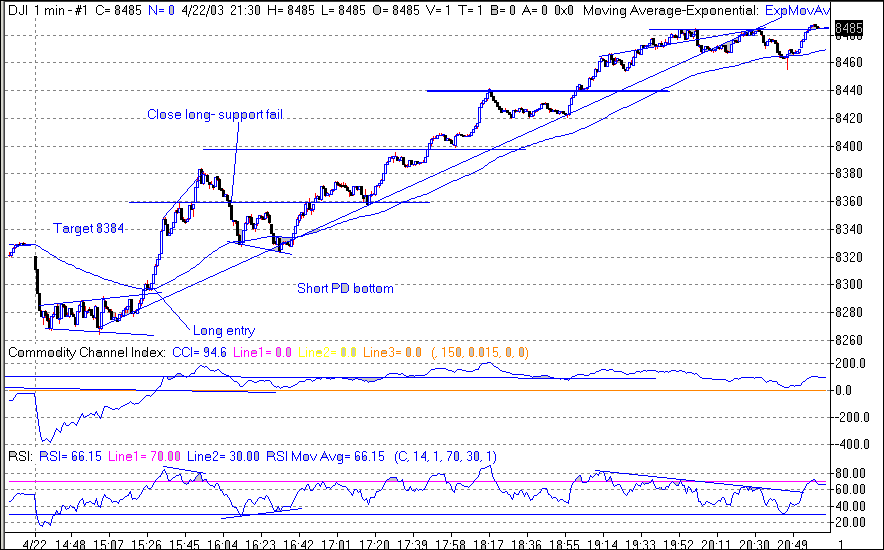
Short term PD & ND is pretty much the same as the usual PD & ND, the main difference being that it is only an indication of a short-term reversal, and is in no way a major signal for a top or a bottom. In Figure 3, we can see a three-peak ND top, which is only across 20 minutes - so no action to be taken here. The short PD bottom indicating a short-term reversal confirmed a "no action" choice.
caption: Figure 3
"Gamble" entries
As with all aspects of this strategy, simplicity is the key. A gamble entry is simply taking an entry from anything other than a safe entry from a pullback to the 100 EMA. The most common "gamble entry" would be to enter from a PD or ND; instead of just exiting at the PD or ND you would look to take a reversal entry at this same level. On a gamble entry, reduce your risk. IF the 100 EMA later confirms your entry is correct, increase your stake to "normal size" by adding another half stake.
Other examples of this kind of entry would be an S/R or R/S switch, a head and shoulder reversal, or a double top or bottom. However, in all cases the target price should be taken into account, as a small target would not make the gamble worthwhile, and a safer entry will be worth waiting for.
S/R and R/S switches
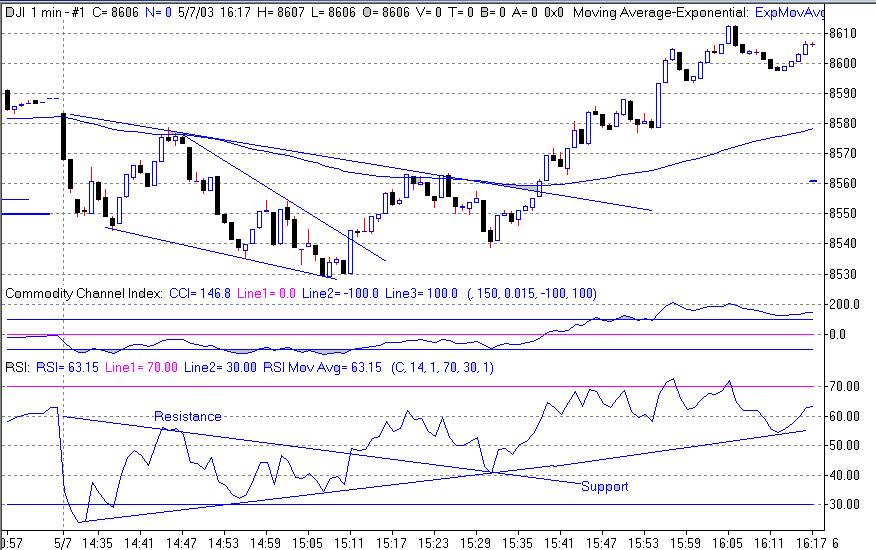
S/R or R/S switch is the change in support to resistance or vice versa in RSI. There are a few good examples of this. Figure 4 shows a close up of a classic R/S switch. If you look again to Figure 1, both an R/S and S/R switch in both CCI and RSI can be seen very clearly.
An R/S or S/R switch can be used in the assessment of a gamble entry. In Figure 4 we can see a change in the resistance becoming support (R/S switch), but in this case it is coupled with a PD bottom giving more strength for the gamble entry to go long, later confirming a safe entry from the 100 EMA.
caption: Figure 4
Targets and Patterns
The purpose of this section is not to explain TA patterns and targets, but to demonstrate how they fit into the 100 EMA trading strategy, to maximise the most out of your trading. There are numerous other formations, but these are some of the more common formations. Further reading should be sought from the weekly commentary on the bulletin board for more detailed explanations and Q & A's.
Target calculation is a key tool in your arsenal. Without it, you will be missing a lot of points. The numbers are never exact. Expect to be a few points under or over. In any case, the following example happens to fall on some very convenient numbers. Usually you get odd numbers. When trading, you need to make a quick approximation at first. Then, as the move progresses in your favour, take time out to try and get as exact as you can. You should always be looking for traditional TA formations, but don't look too hard. If it doesn't jump out at you, it probably isn't there. Remember, as you have seen, that a move can "develop" into a different formation from that which you originally saw.
Flags
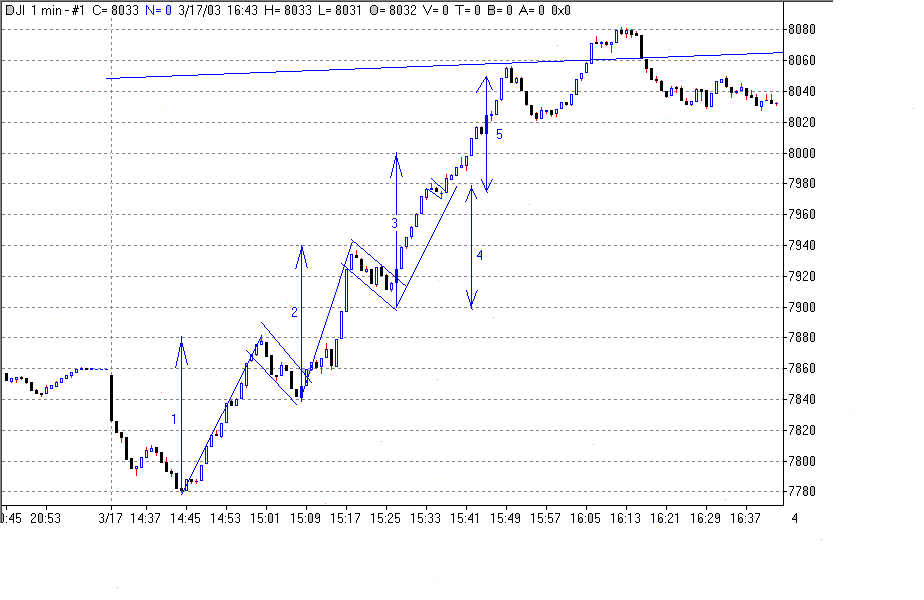
caption: Figure 5
Flags usually have 3 cycles, with the breakout coming off the third cycle to the upside in a bull flag. The reverse is true for Bear Flags.
In Figure 5, the first 3 legs up have targets of 100 points from the lowest price in the pullback. However, rise 4 is only 80 points - this is a clue that it's weakening. Add this 80 to the low = 8050.
For each leg up, for the move to continue, the price MUST CONFIDENTLY reach the target. By this I mean no dithering in the middle. (as in the 7860 region). If you reach target, you will soon get a pullback, and then you have 2 choices - close the position, or stay with it. In the final leg (8, 9) the target was 8100, which fell short. But we expected that, didn't we......?
Triangles
Triangles have the same target calculations. Take the "mouth" and add it to the break to the up side, or take it away from the break to the down side. Forget the shape of the triangle - they all mostly work.
Bull Triangles
You take the size of the "mouth" and add it to the trend line at the breakout point. In Figure 6, (as is often the case in a bull triangle) it is the horizontal resistance line. If it breaks to the downside, subtract the mouth value from the support break trend line to get your "short" target. The target is usually met by the time the triangle lines (theoretically) would have reached a point, and the breakout point is usually defined as occurring between 60% and 75% of the distance from the start (mouth) and the theoretical apex. Note there are almost always three cycles in the triangle before the breakout. The 3rd low cycle was at 8270.
You will often get a clue about the direction of the break by looking at RSI and CCI, and also where the 100 EMA line is relative to the body of the triangle. I call this the "balance of power" in the triangle. In this case, the balance was below the 100 EMA, and could have led to a break to the down side. Here, the final overriding clue was the early small false break to the upside, followed by a dip, not to the support line, and not breaking the 100 EMA. (the middle "confirmation pullback"). Watch out for the false blips!!!!
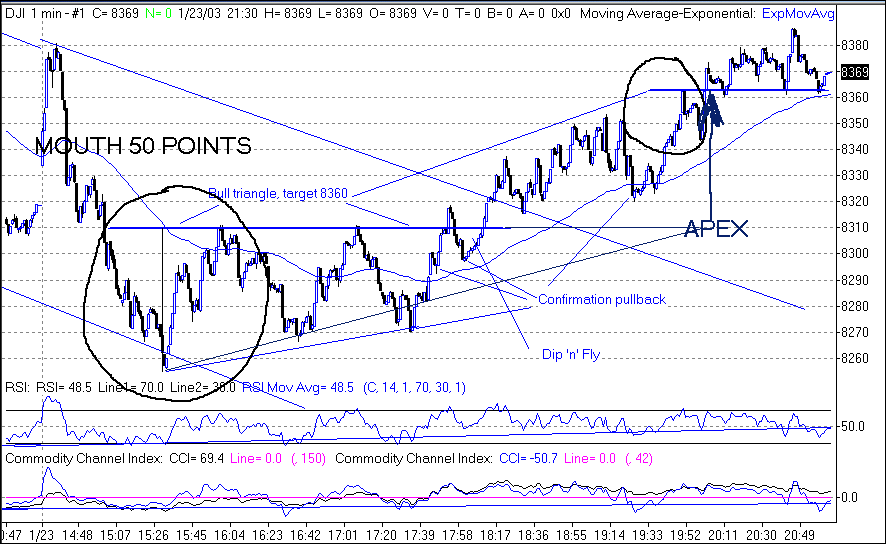
caption: Figure 6
Bear Triangle
As it's at a top, we expect it to have the balance of power above the 100 EMA. (In the previous example, it was a bottom, so the BOP was below the 100 EMA). The BOP comes into play in a sideways market, where it may give you a clue to the exit direction. Don't guess it! You already know how big the move will be from the mouth. Just be prepared, and know where the target will be when it goes.
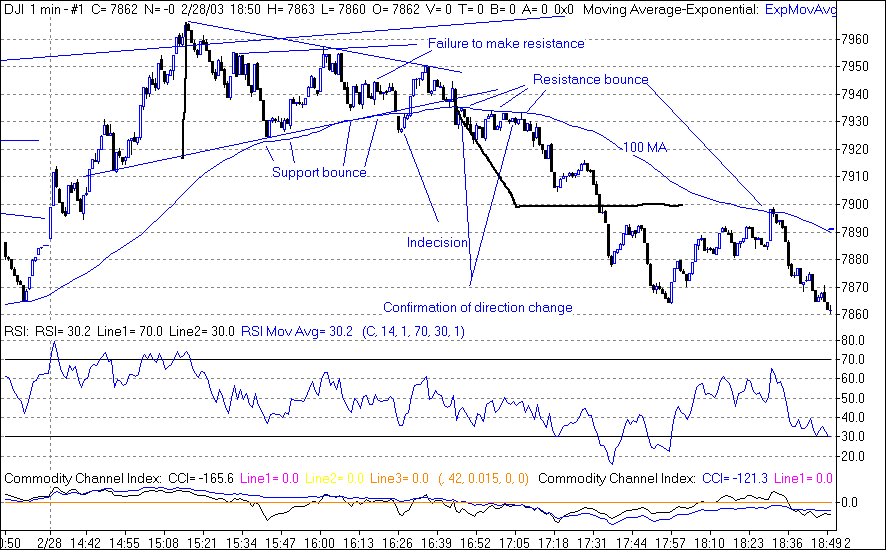
caption: Figure 7
Expanding Triangle
This is a "reverse" or "expanding triangle". These often lead to high volatility. Four days of dithering, followed by one day of massive rise. Same rules, same targets. No doubt, many would have been surprised had they not checked their longer-term timeframes.... BEWARE of these intraday. They are swift, ruthless and will eat you alive!
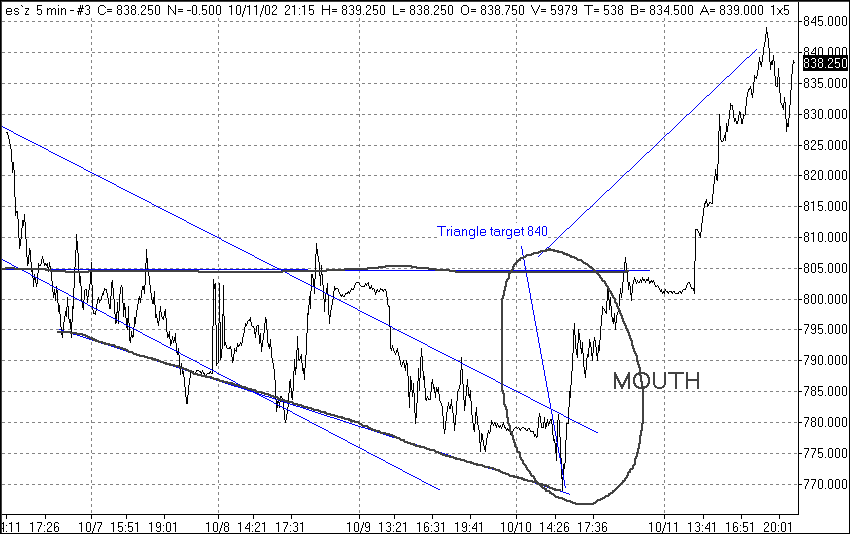
caption: Figure 8
Pullback
Treat it just like a mini bull / bear flag. The main difference is that it occurs as part of a big push up, where the price needs a breather and the MM's need to grab back a few shares - so that they can continue to have move shares available as the price moves up.
Typically, you will only get something like 1 - 4 ticks of pullback. In the example here, the pullback is minute, but defined. The target is 8015+ (8015-7980) = 8050. Note that pullbacks work on the way down too - same rules.
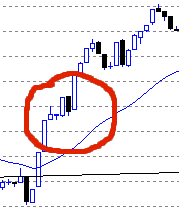
caption: Figure 9
Magic Numbers
The "magic numbers" are 32 and 64. It is an observation over considerable time, that the Dow frequently has a pause or a minor test at these two numbers. There is no explanation as to why this should be and they occur as if by magic.
Other Considerations
RSI Strength of move
Take the move in RSI in this case, from 72 to 32 - 40 points. Take the point's move in the DOW. In this example, from 7470 to 7435 = 35 points. IF you get 1:1 correlation, the move is AVERAGE. IF you get: 1.5: 1 the move is STRONG. So a 40 point move in RSI should give a point move in the Dow of >60 points for a strong move. Strong moves don't go pear shaped if you are on the right side of the trade.
To make it simpler take the number of points the market has moved and divide that by the number of points move in RSI. >1:5 the move is strong and unlikely to go wrong. <1:1 the move is weak.
RSI considerations
As stated earlier, be careful about declaring RSI less than 30 as well oversold. You need to take note of RSI values throughout the day. If the low today was 12, then you can't say 30 is oversold... BUT next week, sometime, that statement may well be true. For example if the low is at 9180, RSI was at 12 it would be difficult to consider the RSI at 30 as being oversold.
Indicator Patterns
We can see the same formations in CCI and the RSI, and they will often breakout before the price, action giving us valuable clues as to the possible direction and timing of the move. The best way to use these indications is by confirming an opinion formed by the price action.
For example, you can get an earlier exit from the first long, in Figure 10, just as the triangle in both CCI and RSI breaks down before a safe entry is confirmed by the 100 EMA. A gamble entry could be considered at this point but as the 100 EMA is so close, waiting for a safe entry will not lose many points in this example. Additionally, there is a H&S reversal pattern that has formed at the same time. With several pieces of information all pointing to the same thing, the exit was a good decision. To close the long and the reverse for a gamble entry short is also a reasonable entry on this occasion.
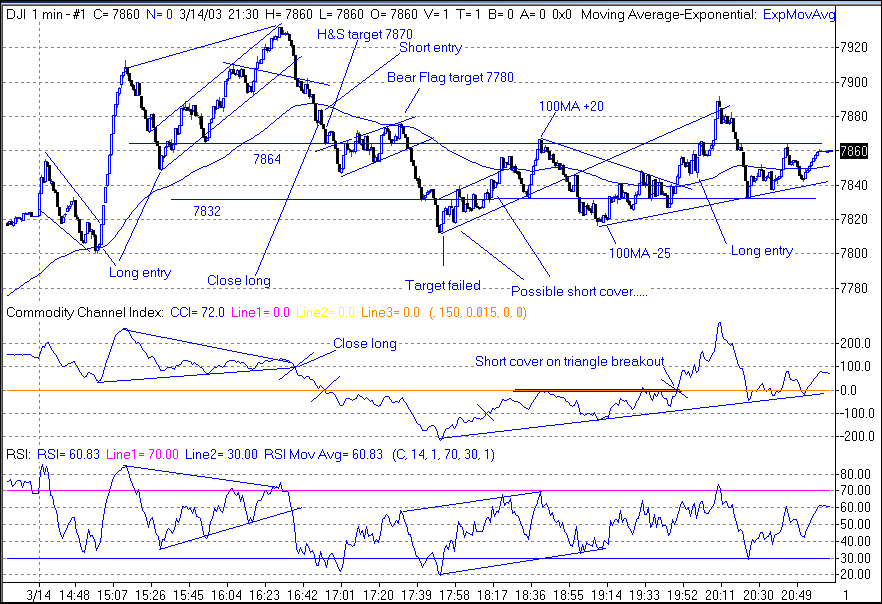
caption: Figure 10
Continuation of TA
For the continuation of TA - other than support and resistance levels - you should essentially be looking for today's open to be as close to yesterdays close as possible in order to continue yesterdays closing analysis.
Figures 11 & 12 show the long-term support and resistance lines and those same levels for the following days trading, so you can really appreciate that they are important, once they are established. In this case, 8510, 8550 and 8580, the latter going back to 2nd May.
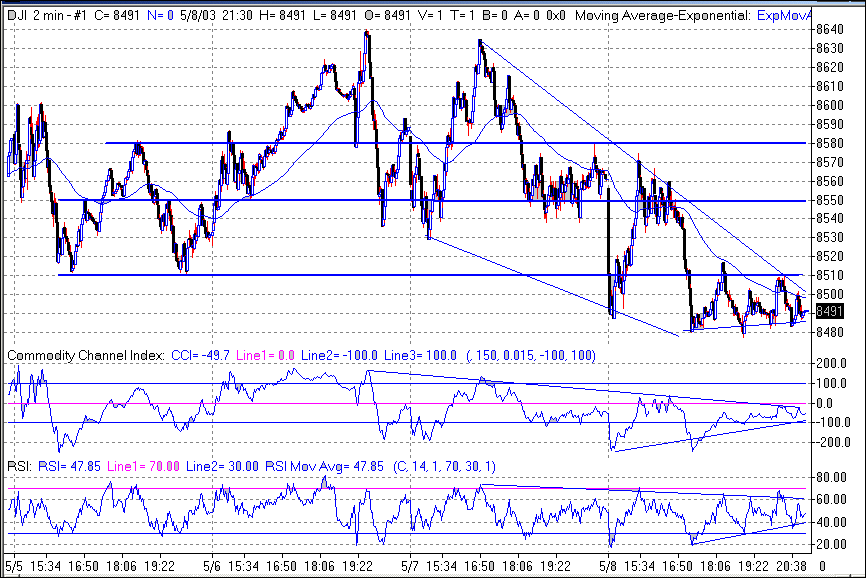
caption: Figure 11
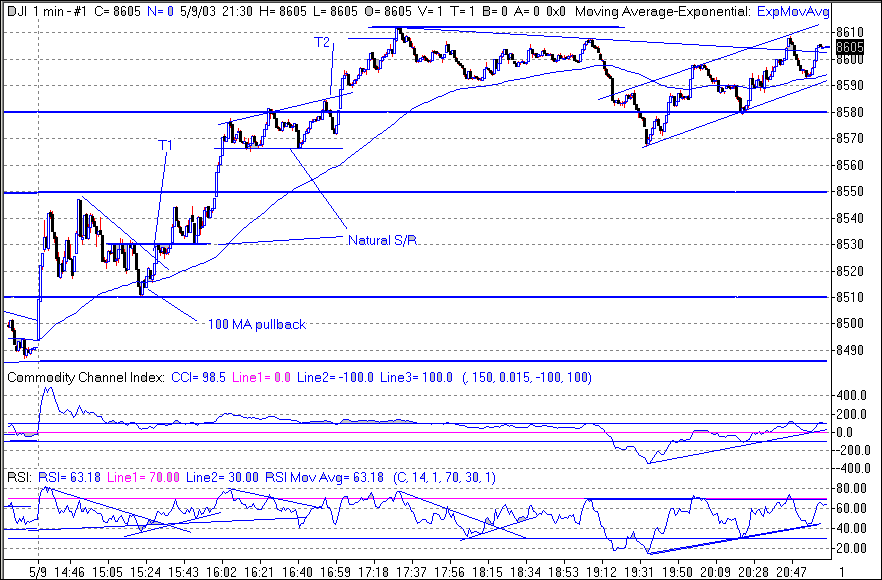
caption: Figure 12
Cross-market analysis: Dow Jones / mini S&P500
These are all simple tools that you can use to get the most out of the information that is in front of you. Cross-market analysis is another in a vast array. We can see in Figure 13 that there is a double top formation on the Dow... but if we compare this to the mini S&P in Figure 14, we can clearly see a three-peak ND top. Not so convincing from the Dow alone, but using the mini S&P to confirm, we get the complete picture.
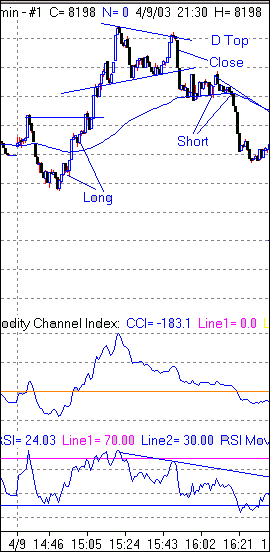
caption: Figure 13
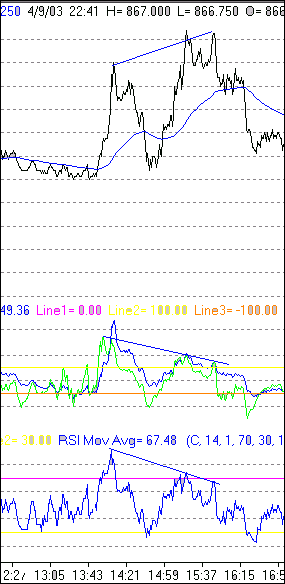
caption: Figure 14
The Bigger Picture
All the same rules apply for the longer-term picture. Take a quick look at where we can get some support and resistance first. As a divergence set in early on, and continued throughout, it's reasonable to presume that there is support at 8480 - which coincides with the triangle target. But why is this important? Well, we need to be prepared to make a trading decision. If we are aware that there we are in a target area with PD developing, we can be confident that there is strong support in this same area.
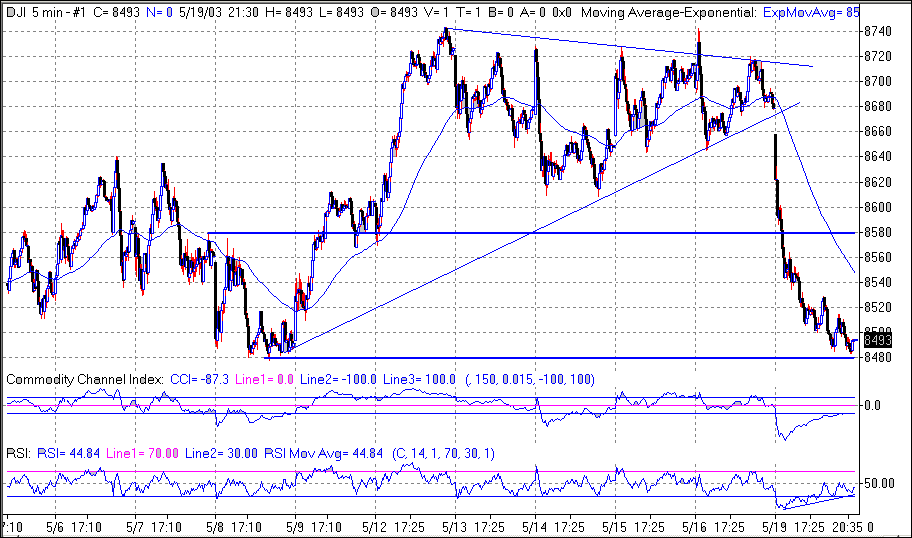
caption: Figure 15
Putting it all together
The early bull flag here (Figure 16) at 15:00 signalled a good entry on the break, but soon became quite volatile, requiring a sharp eye to get out and short, before taking on the "safe" long (3 options around 8020).
The triangle then set the target for the rise to 8090, which was duly delivered and also set up the first part of the Negative Divergence top. As it turned out, there were multiple exits possible here, all within a few points, ending with the fourth peak. The safe entry short was soon confirmed after that, and a rapid drop to 8025 followed. The only clues for a possible early exit here was the RS switch in both CCI and RSI.
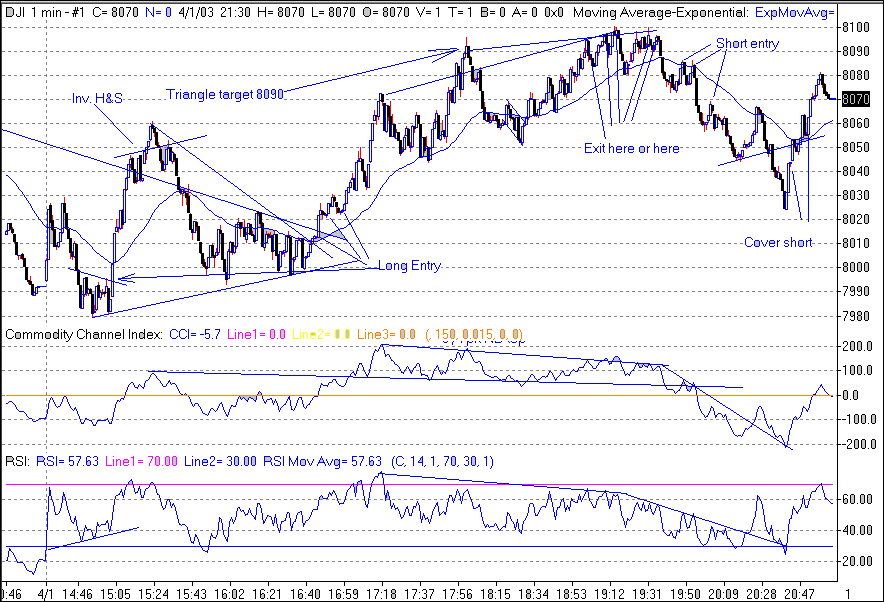
caption: Figure 16
Another good trading day, with plenty of action, to see how it all fits together (Figure 17).
Be patient and wait for something to develop in TA to get some pointers as to where we were going.
The signals eventually developed, giving three separate targets between 8305 and 8310. First, the triangle, and then the bull flags - and then the pullback. All went well until 8310, when you should have spotted two things developing.
1. A possible H&S developed. This became void at 20:09 as the price pulled away from the support (shown on chart). 8301 was the target.
2. The peak at 8317 should have got you looking for possible divergences setting in, which there was, in both CCI and RSI.
Now here's the crunch. One would have expected a third rise to complete the negative divergence. It didn't happen. The time frame was correct at 24 minutes. As soon as the price broke the support line from the H&S, that should have made you hit the sell button. I got out here for a measly 2 points. If you missed that exit, you would only have lost 30 points max from there... so no big deal. Those that got in early should have made close on 100 points.
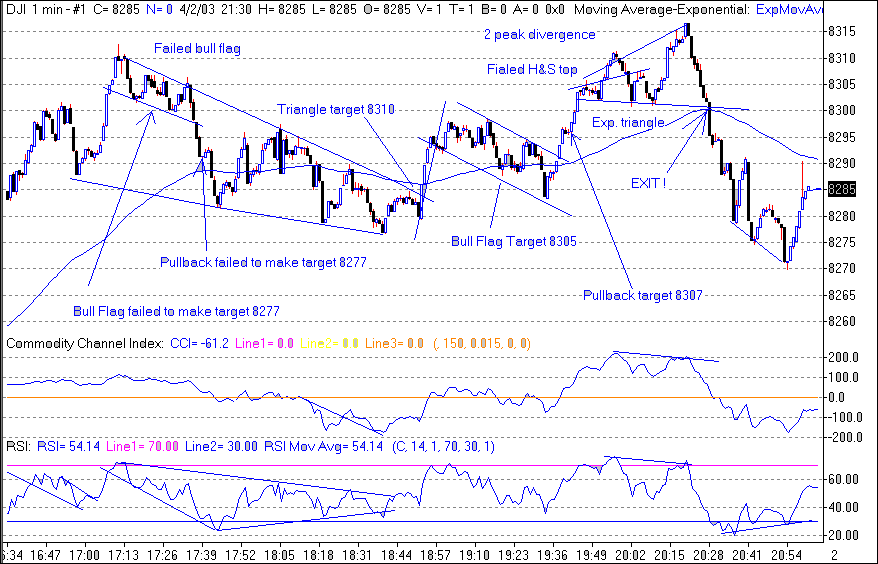
caption: Figure 17
Conclusion
The methodologies shown here should give you enough information to form the basis of a profitable trading strategy - but remember, there are no guarantees in trading and the success or failure of any one person will depend on many factors. All trading is, of course, high risk and you should never trade with money you can't afford to lose.
The "rules" of the strategy can change over time as the markets themselves change with new players each day, and since this strategy was originally written in 2003, there have been some substantial changes in the way the markets work. There has been the Iraq conflict, which still affects the markets quite dramatically from time to time, and the recent US Presidential Elections. All these factors and more can blow your TA clean out of the water, and you should factor them into your trading. Be careful trading around news announcements (typically these are 10am EST), and know what announcements are coming up during the trading day. As always, if you have any questions, feel free to raise them on the forums.
The strategy detailed in this article was written almost two years ago and has been available on the forums throughout that time. Since then, there have been many members of Trade2Win who have commented on how it has improved their trading. Even today, two years on, the rules devised are still valid. There have been new "discoveries"- the magic 32 and 64 to name but one, and yet there are still mysteries that have to be resolved.
Even so, this document will probably stand the test of time, which is to help newbies get a feel for trading the Dow, and at the same time, stay in the game by way of capital preservation. It has given me great pleasure in receiving thanks from many members. Truly gratifying. This is just the beginning, do not despair, there IS light at the end of the tunnel. If this instills some enthusiasm in your loins, you could do worse than reviewing all of the Dow Intraday threads from the archives of T2W where you will no doubt come across more gems from time to time.
The strategy is based on a spread betting system. It can, with experience, be tailored to make it suitable for trading mini-sized Dow futures.
The Strategy
This strategy utilises several technical indicators in order to gauge the correct moment to enter the market:
The 100 EMA is a 100-minute Exponential Moving Average. Trades are entered and / or closed depending upon the crossing of the 100 EMA by the price.
RSI is Relative Strength Indicator. RSI was developed by J. Welles Wilder in 1978, and this indicator is one of several indicators called "oscillators" because it varies between fixed upper and lower limits. Very basically, "buy" (or long) signals are considered to be readings of 30 or less (the instrument is considered oversold) and "sell" (or short) signals are considered to be readings of 70 or greater (the instrument is considered overbought). However, depending on the analyst and price volatility, there are various other qualifiers and nuances that can be incorporated into a signal. For example, in very volatile markets, the bounds of 20 and 80 might be used to judge oversold and overbought conditions. Additionally, the settings for RSI as specified in this article are for those analysts using a 1 minute chart. If you choose to trade at a higher timeframe, you may need to adjust these settings - but I have not focussed on using the strategy on such timeframes and cannot therefore comment on its effectiveness.
CCI is the Commodity Channel Index. This measures the position of price in relation to its moving average. This can be used to highlight when the market is overbought / oversold, or to signal when a trend is weakening.
The Basics
Enter a trade on a confirmation of a break of the 100 EMA - a confirmation is when the price pulls back towards the 100 EMA, and then continues in the direction of the breakout.
Stay in the trade all the time that the price remains through the 100 EMA.
Exit the trade on confirmation of a top or a bottom of a short term trend, or exit the trade when the price has broken the 100 EMA in the opposite direction to your entry plus 20 points.
If you are in a trade, and the price is within + or - 20 points of the 100 MA, DO NOT EXIT a trade. Remember, all the time the price is outside the 100 MA (+/- 20) we DO NOT panic an exit.
DO NOT ENTER a trade if CCI is less than -200, greater than 200, or RSI is less than 20 or greater than 80 - the reason being is that at these points we can experience major volatility.
For example, look at Figure 1, when the price pulled back at 8,220 and CCI was near -200; you may be tempted to go long here and get into position early. Bad move! There is a clear bounce off RSI 22 as well... yet the open on this day saw RSI drop to 18 or so: that fixes the low of the day, so you have to be prepared for a drop back to that level.
At these extremes, you need to wait for price confirmation - i.e. a higher high and a higher low, before going long at extremes of RSI and CCI. Remember this strategy is about safe trading, not suicidal gambles. Consistent small wins are the road to riches.
The name of the game is to MINIMISE losses and let WINNERS run. Secondary to this is trying to get the odds in your favour of making a successful trade, as opposed to a gamble.
We'll find out what tops and bottoms we can expect to see, how we can calculate each mini move with expected targets, and how we can analyse the risk we are taking by staying in a trade, as opposed to exiting early.
You should not look at the spread bet price until you are ready to close your trade. Basing your decisions on the SB price will just freak you out of a trade. Now and again, it will undoubtedly cost you a bit more as we enter a "bad" trade. Hopefully, on balance, the number of good trades will more than cover you!
Our typical targets will be between 50 and 150 points. Those of you wanting to take a longer term view (and if you're not averse to holding positions overnight) you can apply exactly the same rules to the 10 minute chart with the same results.
One final rule: as one door closes, another one opens - NOT!!!! Just because we exit at a top, or a bottom, this is NOT a signal to reverse the trade. We are not scalping here!
When you close a winning trade, sit back and congratulate yourself. Take time to see if the action continues in your favour. Did you get out early? Where will we find our next entry?
One of the keys to trading is to be constantly assessing your opinion and the situation. W.D. Gann once said "Always be prepared to have a change of mind".
Chart Settings
1-Minute Charts for DJIA
100 Exponential Moving Average
CCI 150
RSI 14
Stake Size
The important thing, especially when you are first starting out, is to make sure that you "Stay in the Game", as most of your learning will come when you're actually trading.
The accepted level of risk amongst the professional traders and the trading authors is 1% of your capital on every trade. When your risk increases, any bad run that you have will be magnified. You should therefore reduce the stake size to the point where you are very comfortable with the level of loss that a triggered stop will cause.
If you decide on a gamble entry, reduce your risk. If the 100 MA later confirms your entry is correct, increase your stake to "normal size" by adding another half stake.
Entries
Safe entry and safe reversal
The safe entry is from the price crossing the 100 EMA line - and waiting for the pullback. For reversing a position, this is also the criteria that should be used.

caption: Figure 1
Exits - Tops and Bottoms
Now that we have found an entry, we need to check out RSI and CCI to see if we can pick out an exit. If we are getting positive divergence (price down, indicators up), alarm bells need to start ringing. Would this price action continue?
Rule 1: For Positive Divergence (PD) confirmation, there should be 3 peaks lining up in the price and in either RSI, CCI, or - better still - both.
Rule 2: The timescale must be a minimum of 25 minutes across the 3 peaks.
Rule 3: If a divergence started at the open it should always be ignored.
The 3rd low is your first signal to exit the trade. Usually you will get one more chance to exit before the whole thing goes in the other direction, but don't count on it. Don't be greedy. Getting out on the 3rd peak of a 3-peak divergence is usually the very best exit.
Now we need to look for another entry. This could be a LONG or a SHORT. It doesn't matter. Don't be pre-conditioned into thinking a short has to be followed by a long, and vice versa! The reverse is true for Negative Divergence (ND).
PD and ND Exits
The exit decisions for both ND and PD are clearly shown in Figure 2.
The first exit is from an ND over 37 minutes. At the same time this is forming we are looking for an entry from the open of the trading day. Five possible entries are marked, although by around 15:45 the final peak is formed in the ND and an exit should be taken. The next entry is a safe entry from a pull back to the 100 EMA. Once again, a PD bottom starts forming over 45 minutes, and an exit should be taken at the third trough.

caption: Figure 2
Short term PD and ND
Short term PD & ND is pretty much the same as the usual PD & ND, the main difference being that it is only an indication of a short-term reversal, and is in no way a major signal for a top or a bottom. In Figure 3, we can see a three-peak ND top, which is only across 20 minutes - so no action to be taken here. The short PD bottom indicating a short-term reversal confirmed a "no action" choice.

caption: Figure 3
"Gamble" entries
As with all aspects of this strategy, simplicity is the key. A gamble entry is simply taking an entry from anything other than a safe entry from a pullback to the 100 EMA. The most common "gamble entry" would be to enter from a PD or ND; instead of just exiting at the PD or ND you would look to take a reversal entry at this same level. On a gamble entry, reduce your risk. IF the 100 EMA later confirms your entry is correct, increase your stake to "normal size" by adding another half stake.
Other examples of this kind of entry would be an S/R or R/S switch, a head and shoulder reversal, or a double top or bottom. However, in all cases the target price should be taken into account, as a small target would not make the gamble worthwhile, and a safer entry will be worth waiting for.
S/R and R/S switches
S/R or R/S switch is the change in support to resistance or vice versa in RSI. There are a few good examples of this. Figure 4 shows a close up of a classic R/S switch. If you look again to Figure 1, both an R/S and S/R switch in both CCI and RSI can be seen very clearly.
An R/S or S/R switch can be used in the assessment of a gamble entry. In Figure 4 we can see a change in the resistance becoming support (R/S switch), but in this case it is coupled with a PD bottom giving more strength for the gamble entry to go long, later confirming a safe entry from the 100 EMA.

caption: Figure 4
Targets and Patterns
The purpose of this section is not to explain TA patterns and targets, but to demonstrate how they fit into the 100 EMA trading strategy, to maximise the most out of your trading. There are numerous other formations, but these are some of the more common formations. Further reading should be sought from the weekly commentary on the bulletin board for more detailed explanations and Q & A's.
Target calculation is a key tool in your arsenal. Without it, you will be missing a lot of points. The numbers are never exact. Expect to be a few points under or over. In any case, the following example happens to fall on some very convenient numbers. Usually you get odd numbers. When trading, you need to make a quick approximation at first. Then, as the move progresses in your favour, take time out to try and get as exact as you can. You should always be looking for traditional TA formations, but don't look too hard. If it doesn't jump out at you, it probably isn't there. Remember, as you have seen, that a move can "develop" into a different formation from that which you originally saw.
Flags

caption: Figure 5
Flags usually have 3 cycles, with the breakout coming off the third cycle to the upside in a bull flag. The reverse is true for Bear Flags.
In Figure 5, the first 3 legs up have targets of 100 points from the lowest price in the pullback. However, rise 4 is only 80 points - this is a clue that it's weakening. Add this 80 to the low = 8050.
For each leg up, for the move to continue, the price MUST CONFIDENTLY reach the target. By this I mean no dithering in the middle. (as in the 7860 region). If you reach target, you will soon get a pullback, and then you have 2 choices - close the position, or stay with it. In the final leg (8, 9) the target was 8100, which fell short. But we expected that, didn't we......?
Triangles
Triangles have the same target calculations. Take the "mouth" and add it to the break to the up side, or take it away from the break to the down side. Forget the shape of the triangle - they all mostly work.
Bull Triangles
You take the size of the "mouth" and add it to the trend line at the breakout point. In Figure 6, (as is often the case in a bull triangle) it is the horizontal resistance line. If it breaks to the downside, subtract the mouth value from the support break trend line to get your "short" target. The target is usually met by the time the triangle lines (theoretically) would have reached a point, and the breakout point is usually defined as occurring between 60% and 75% of the distance from the start (mouth) and the theoretical apex. Note there are almost always three cycles in the triangle before the breakout. The 3rd low cycle was at 8270.
You will often get a clue about the direction of the break by looking at RSI and CCI, and also where the 100 EMA line is relative to the body of the triangle. I call this the "balance of power" in the triangle. In this case, the balance was below the 100 EMA, and could have led to a break to the down side. Here, the final overriding clue was the early small false break to the upside, followed by a dip, not to the support line, and not breaking the 100 EMA. (the middle "confirmation pullback"). Watch out for the false blips!!!!

caption: Figure 6
Bear Triangle
As it's at a top, we expect it to have the balance of power above the 100 EMA. (In the previous example, it was a bottom, so the BOP was below the 100 EMA). The BOP comes into play in a sideways market, where it may give you a clue to the exit direction. Don't guess it! You already know how big the move will be from the mouth. Just be prepared, and know where the target will be when it goes.

caption: Figure 7
Expanding Triangle
This is a "reverse" or "expanding triangle". These often lead to high volatility. Four days of dithering, followed by one day of massive rise. Same rules, same targets. No doubt, many would have been surprised had they not checked their longer-term timeframes.... BEWARE of these intraday. They are swift, ruthless and will eat you alive!

caption: Figure 8
Pullback
Treat it just like a mini bull / bear flag. The main difference is that it occurs as part of a big push up, where the price needs a breather and the MM's need to grab back a few shares - so that they can continue to have move shares available as the price moves up.
Typically, you will only get something like 1 - 4 ticks of pullback. In the example here, the pullback is minute, but defined. The target is 8015+ (8015-7980) = 8050. Note that pullbacks work on the way down too - same rules.

caption: Figure 9
Magic Numbers
The "magic numbers" are 32 and 64. It is an observation over considerable time, that the Dow frequently has a pause or a minor test at these two numbers. There is no explanation as to why this should be and they occur as if by magic.
Other Considerations
RSI Strength of move
Take the move in RSI in this case, from 72 to 32 - 40 points. Take the point's move in the DOW. In this example, from 7470 to 7435 = 35 points. IF you get 1:1 correlation, the move is AVERAGE. IF you get: 1.5: 1 the move is STRONG. So a 40 point move in RSI should give a point move in the Dow of >60 points for a strong move. Strong moves don't go pear shaped if you are on the right side of the trade.
To make it simpler take the number of points the market has moved and divide that by the number of points move in RSI. >1:5 the move is strong and unlikely to go wrong. <1:1 the move is weak.
RSI considerations
As stated earlier, be careful about declaring RSI less than 30 as well oversold. You need to take note of RSI values throughout the day. If the low today was 12, then you can't say 30 is oversold... BUT next week, sometime, that statement may well be true. For example if the low is at 9180, RSI was at 12 it would be difficult to consider the RSI at 30 as being oversold.
Indicator Patterns
We can see the same formations in CCI and the RSI, and they will often breakout before the price, action giving us valuable clues as to the possible direction and timing of the move. The best way to use these indications is by confirming an opinion formed by the price action.
For example, you can get an earlier exit from the first long, in Figure 10, just as the triangle in both CCI and RSI breaks down before a safe entry is confirmed by the 100 EMA. A gamble entry could be considered at this point but as the 100 EMA is so close, waiting for a safe entry will not lose many points in this example. Additionally, there is a H&S reversal pattern that has formed at the same time. With several pieces of information all pointing to the same thing, the exit was a good decision. To close the long and the reverse for a gamble entry short is also a reasonable entry on this occasion.

caption: Figure 10
Continuation of TA
For the continuation of TA - other than support and resistance levels - you should essentially be looking for today's open to be as close to yesterdays close as possible in order to continue yesterdays closing analysis.
Figures 11 & 12 show the long-term support and resistance lines and those same levels for the following days trading, so you can really appreciate that they are important, once they are established. In this case, 8510, 8550 and 8580, the latter going back to 2nd May.

caption: Figure 11

caption: Figure 12
Cross-market analysis: Dow Jones / mini S&P500
These are all simple tools that you can use to get the most out of the information that is in front of you. Cross-market analysis is another in a vast array. We can see in Figure 13 that there is a double top formation on the Dow... but if we compare this to the mini S&P in Figure 14, we can clearly see a three-peak ND top. Not so convincing from the Dow alone, but using the mini S&P to confirm, we get the complete picture.

caption: Figure 13

caption: Figure 14
The Bigger Picture
All the same rules apply for the longer-term picture. Take a quick look at where we can get some support and resistance first. As a divergence set in early on, and continued throughout, it's reasonable to presume that there is support at 8480 - which coincides with the triangle target. But why is this important? Well, we need to be prepared to make a trading decision. If we are aware that there we are in a target area with PD developing, we can be confident that there is strong support in this same area.

caption: Figure 15
Putting it all together
The early bull flag here (Figure 16) at 15:00 signalled a good entry on the break, but soon became quite volatile, requiring a sharp eye to get out and short, before taking on the "safe" long (3 options around 8020).
The triangle then set the target for the rise to 8090, which was duly delivered and also set up the first part of the Negative Divergence top. As it turned out, there were multiple exits possible here, all within a few points, ending with the fourth peak. The safe entry short was soon confirmed after that, and a rapid drop to 8025 followed. The only clues for a possible early exit here was the RS switch in both CCI and RSI.

caption: Figure 16
Another good trading day, with plenty of action, to see how it all fits together (Figure 17).
Be patient and wait for something to develop in TA to get some pointers as to where we were going.
The signals eventually developed, giving three separate targets between 8305 and 8310. First, the triangle, and then the bull flags - and then the pullback. All went well until 8310, when you should have spotted two things developing.
1. A possible H&S developed. This became void at 20:09 as the price pulled away from the support (shown on chart). 8301 was the target.
2. The peak at 8317 should have got you looking for possible divergences setting in, which there was, in both CCI and RSI.
Now here's the crunch. One would have expected a third rise to complete the negative divergence. It didn't happen. The time frame was correct at 24 minutes. As soon as the price broke the support line from the H&S, that should have made you hit the sell button. I got out here for a measly 2 points. If you missed that exit, you would only have lost 30 points max from there... so no big deal. Those that got in early should have made close on 100 points.

caption: Figure 17
Conclusion
The methodologies shown here should give you enough information to form the basis of a profitable trading strategy - but remember, there are no guarantees in trading and the success or failure of any one person will depend on many factors. All trading is, of course, high risk and you should never trade with money you can't afford to lose.
The "rules" of the strategy can change over time as the markets themselves change with new players each day, and since this strategy was originally written in 2003, there have been some substantial changes in the way the markets work. There has been the Iraq conflict, which still affects the markets quite dramatically from time to time, and the recent US Presidential Elections. All these factors and more can blow your TA clean out of the water, and you should factor them into your trading. Be careful trading around news announcements (typically these are 10am EST), and know what announcements are coming up during the trading day. As always, if you have any questions, feel free to raise them on the forums.
Last edited by a moderator:

